
Rotary Speaker MKIII - isolation cabinet - part 2

Part 2

Concrete

We live in a small 'council flat' in Tokyo. There are neighbours above, below and to either side. They're decent folk and I don't want to push it by making too much noise. Nonetheless, I'm sure I disturb them from time to time with my music and DIY activities. They probably can't tell the difference between the two...

That's one reason to embark on an isolation cabinet. The other is a question of sound balance since I generally do everything at low volume. The problem is I need to have the rotary speaker significantly louder in order to mic it up to get a healthy signal into the mix. Therefore, unless the speaker is in another room (which I don't have), it will just drown everything else out. This got me thinking that perhaps an isolation cabinet could be the answer?

There are acoustic challenges with this approach - not least the way an enclosed space (unless expertly designed) affects the sound in an undesirable way. Typically the sound becomes 'boxy'. My approach was to just go ahead anyway, see if I could figure out ways to limit such issues and hopefully learn something along the way. I've made some attempt to incorporate 'the science', but not too much as that would probably have resulted in me abandoning the project!

Here's the enclosure - the wood surround has a thickness of 15 mm. The top and bottom surfaces are MDF (not quick as thick).


With the top removed showing the speaker/motor unit mounted inside. There's a layer of neoprene rubber in between to help cushion vibrations as it spins
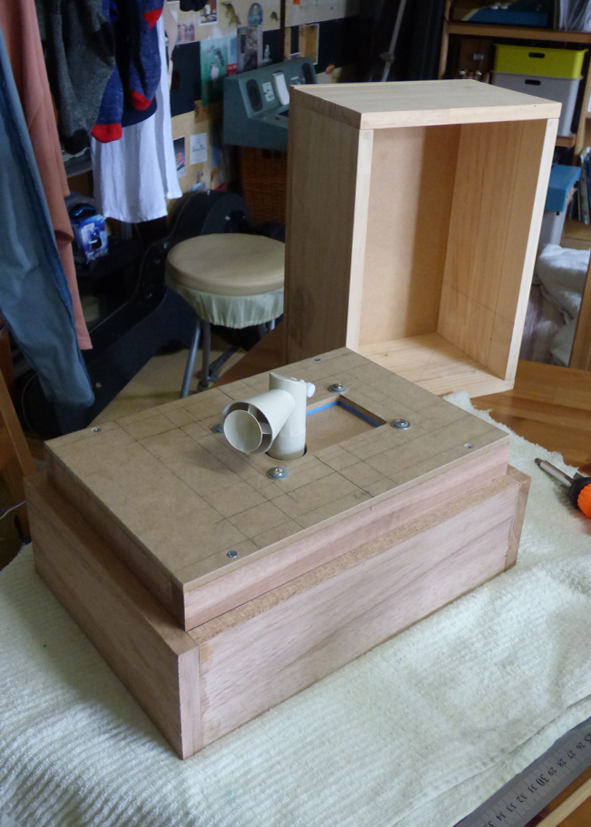

Seen from below...


By itself, the wood doesn't do much to stop sound escaping, so the next step was filling the interior with concrete. First, I lined the enclosure with carpet. This mainly helps the concrete key to the inner surface and the rubber backing should help avoid vibrations...well, that's the theory. I inserted short lengths of dowel to provide further support since this section will be turned 'upside down' when placed over the speaker.


I set an initial layer of concrete as a base inside the two parts of the enclosure. On the left is the lower part. The plastic pot is there to form a space that will accommodate the back of the speaker and a short length of garden hose through which cables will eventually run.


Additionally, I set some screws into the wet concrete. These protrude so that when the next layer of concrete is poured, they provide some extra support.


The next step was to make a former for the cavity in which the rotor will turn. The elongated shape allows for a microphone to be position some distance from the spinning rotor, while the flat end creates a 'reflective' surface for the sound to bounce off.


The second pour...


 For the lower section, I made a rough frame out of scrap wood to create a rectangular space to accommodate the speaker/motor unit


In all, I used around 10kg of concrete. With all other parts, including the speaker and motor, the whole thing weighs in at just under 17kg.

The concrete had several weeks of curing before I moved on to the next stage but in part 3, I'll show how I finished the enclosure and hopefully post a video to demonstrates how it cuts down the sound to the outside world.


Comments

Popular posts from this blog

Yamaha PS-30 : Solo Section Filter and De-tune Mods

Behind the Yamaha PS-30's "Solo" section, there's a simple monophonic analogue synth. Here's how I brought the filter and tuning controls to the front panel...Quite simple, it's involves removing 3 trimmer pots from the PCB and replacing them with regular potentiometers mounted on the front panel. First, however, much gratitude goes to the excellent Table Hooters site for the detailed information on this keyboard's inner workings: http://weltenschule.de/TableHooters/Yamaha_PS-30_PS-20.html       (click images to enlarge) My Yamaha PS-30 - the green, blue and red knobs (top right) control de-tune, cut-off frequency and resonance respectively You can already access the solo section's tuning control via a removable plug on the back of the case: Removing this plug allows access to a trimmer pot on the PCB. I replaced this with a regular pot mounted on the front panel. Back of case removed... The solo section PCB is the shaded area on t

Casiotone CT-310 external clock sync

The older Casiotone keyboards with analogue circuitry can generally be modified to accept external clock signals for synchronising their rhythms to other equipment - but there are a few caveats: 1. there are various Casiotone 'families' based on different chipsets and implementations. This means there's no standard way to do this across all models and even models that share the same CPU might be programmed differently. For example, with an external clock signal, the CT-310 and the MT-65 sync at the same tempo while the MT-86 plays at half their speed. 2. the mod outlined below might not deliver a rock solid sync - the resultant system can be prone to glitches unless buffered in some way, so making adjustments to tempo on the fly or switching other gear on and off, can cause things to go awry. 3. there are various  sync signal formats in use, (12 ,  24 or 48 ppqn being common), however, these do not apply to the Casiotones. With the mod below, they require multiplying

Rotary Speaker MKIII - isolation cabinet - Part 1

Part 1 First, a little background... If you don't know what a rotary speaker is, Google "Jimmy Smith" or "Leslie speaker". Constructing rotary speakers is an intermittent hobby of mine. In 2011 I built my first from salvaged parts - a motor from a tape deck spinning a coffee filter over an old Fostex speaker, the speed adjusted by a PC fan controller. Here it is: It garnered a favourable response on YouTube, so I embarked on a more elegant approach, still using salvaged parts but with a little more thought and care going into the design. It took a couple of years to get round to making it but here's the result: It hasn't received as many views or comments as the first - not that surprising since I make next to no effort to promote my online presence but I feel it was a step forward... One issue with these things is they have to be mic'ed up to record the effect. So I got to thinking that some kind of isolation could be a solution.